
Triumph of the Byzantine System: The Arab-Byzantine Frontier, Part 3
The decade of the 860s witnessed a momentous shift in the world of the eastern Mediterranean. The Abbasid Caliphate, which for a century had been Byzantium’s most potent adversary, began to crumble. A combination of palace coups and revolts on the periphery greatly weakened Baghdad’s power as caliphs turned their energies away from their Christian enemies to domestic affairs. Never again would the Caliphate pose a mortal threat to Byzantium.
This did not mark the end of the dynasty—indeed, the Abbasids survived for several more centuries—but it did mark the end of centralized Arab power. Unlike the Umayyads, whom the Abbasids had replaced a century before, no strong actor swept onto the stage to take up the mantle of jihad. Instead, there followed a gentle fracturing of the Muslim world, as regional governors began to assert varying levels of autonomy while still acknowledging the nominal authority of Baghdad. The Abbasids themselves periodically launched expeditions into Anatolia—and in their absence some border states continued to raid on their own initiative—but the overall pressure on Byzantium’s eastern frontier had eased considerably.
Nevertheless, the view from Constantinople was not so rosy. Even as things improved in the east, turmoil engulfed the west. Invaders from Tunisia continued to overrun Sicily, where the last Byzantine holdout fell in 902. On mainland Italy, the Franks encroached upon Byzantine territory in the south. Arab pirates in Crete continued to plague the shipping lanes through the Aegean.
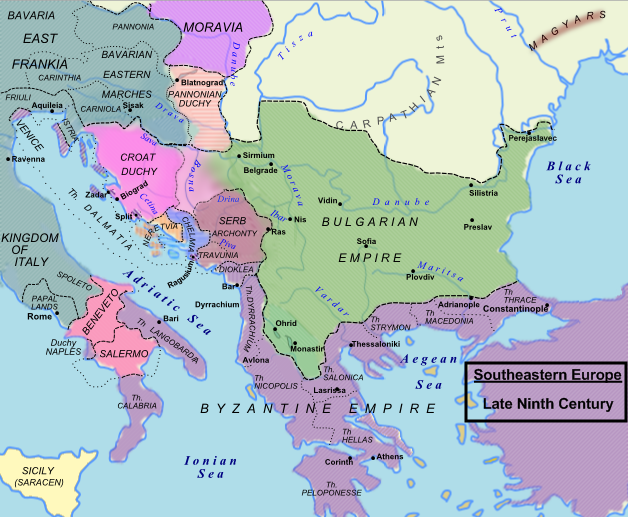
The biggest threat by far was the expansion of Bulgaria. Although not especially large, its strong position near the Byzantine capital made it a constant source of agony. The net result was that when a threat did rear up on the eastern frontier, the Byzantines were comparatively less prepared to meet it than in previous centuries.
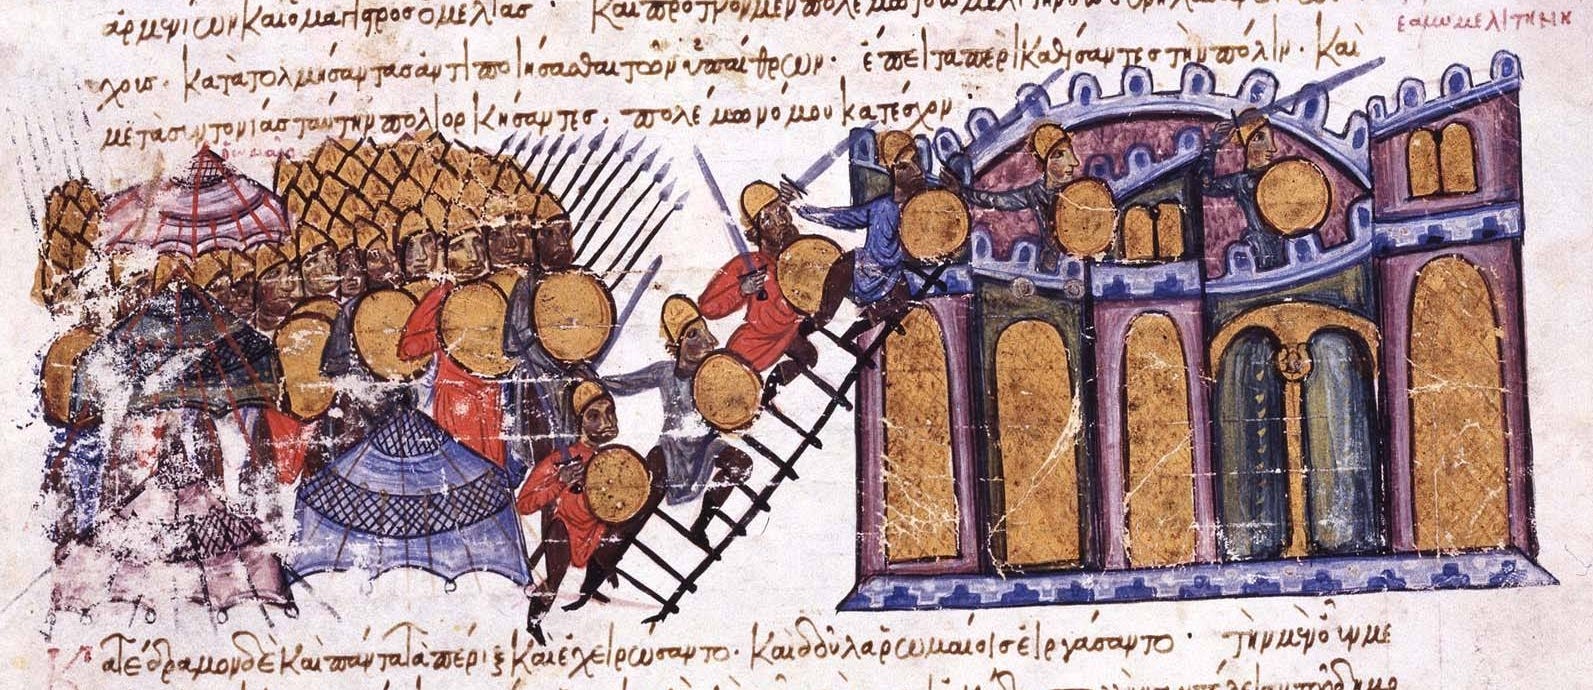
The most aggressive such threat to arise was the Hamdanid dynasty, which came to power in Aleppo in the 940s. The Hamdanids controlled little more than Syria and Mesopotamia, and never approached the strength of the Caliphate in previous centuries—they certainly posed no danger to Constantinople. Yet under their scion Sayf ad-Dawla, they attracted ghazis from all over the Islamic world to participate in annual summer raids which threatened to damage the empire at a delicate time.
In sum, the Hamdanids were a difficult foe, if not quite an existential threat. Byzantine generals of the eastern frontier were forced to adapt their sometimes-limited resources to the challenge, refining the operational techniques pioneered by previous generations. This resulted in a systemization of their operational art which, backed by growing economic might, permanently ended the Arab threat to Anatolia.
A Byzantine Renaissance
Indeed, despite the acute perils that continued to plague the empire into the 10th century, Byzantium’s position was incrementally improving. Territorial losses in Europe notwithstanding, their lands were subjected to considerably less turmoil. In the decades following the devastating sack of Amorion in 838, Arabs incursions tailed off, no longer striking so far west. And for decades before that, raids had largely spared the lowlands of western Anatolia, allowing the empire’s richest provinces to prosper. Commercial links were meanwhile being reforged with Western Europe, which was an increasingly valuable trade partner.
It is thanks to this rising prosperity that we know about Byzantine operational art in great detail. Unlike the early centuries of the Islamic conquests, which were truly a dark age for artistic and literary production all around the Mediterranean, the improving conditions of the 10th century were accompanied by the cultural efflorescence of the so-called Macedonian Renaissance (named after the ruling imperial dynasty). Increasing literacy allowed generals to pass down the lessons they had learned to their successors and subordinates, lending institutional solidity to the army.
A number of manuals written in the 10th century detail these techniques. Although specific to their period, they represent the refinements made over several centuries of the Arab-Byzantine wars. Moreover, they bear the mark of strategy that was apparent from a much earlier period. This piece will look at the methods detailed in the manuals and how they were applied in several campaigns of the mid-10th century.
Straddling East and West
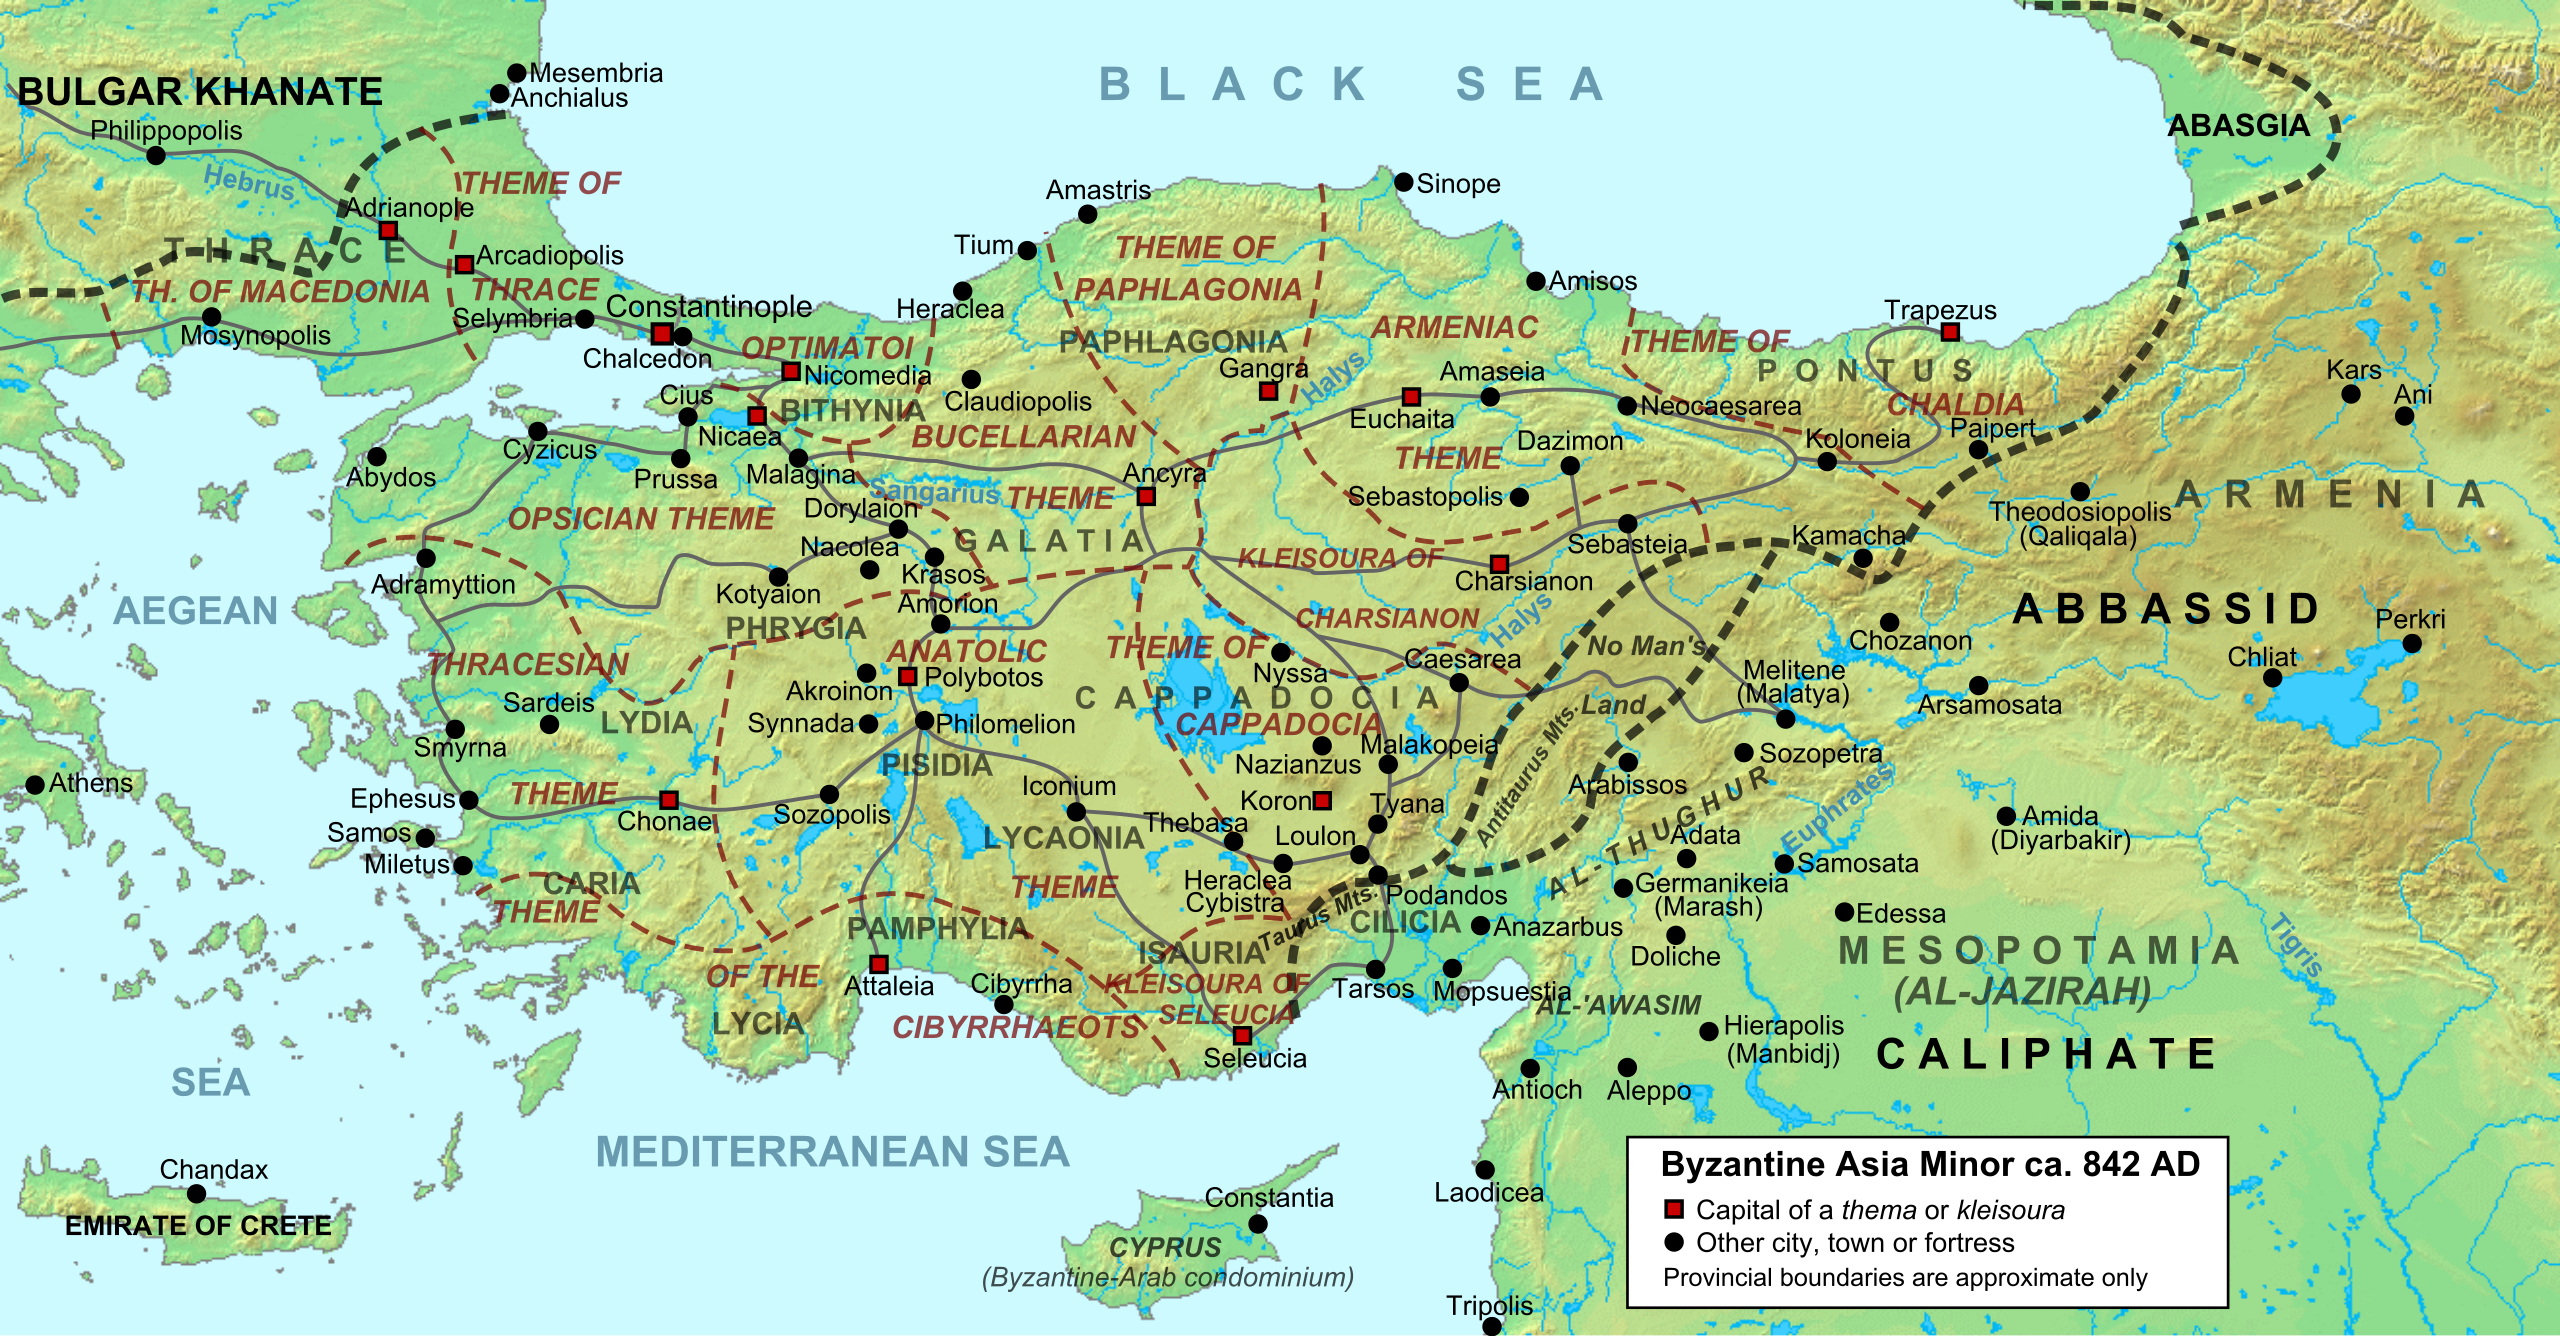
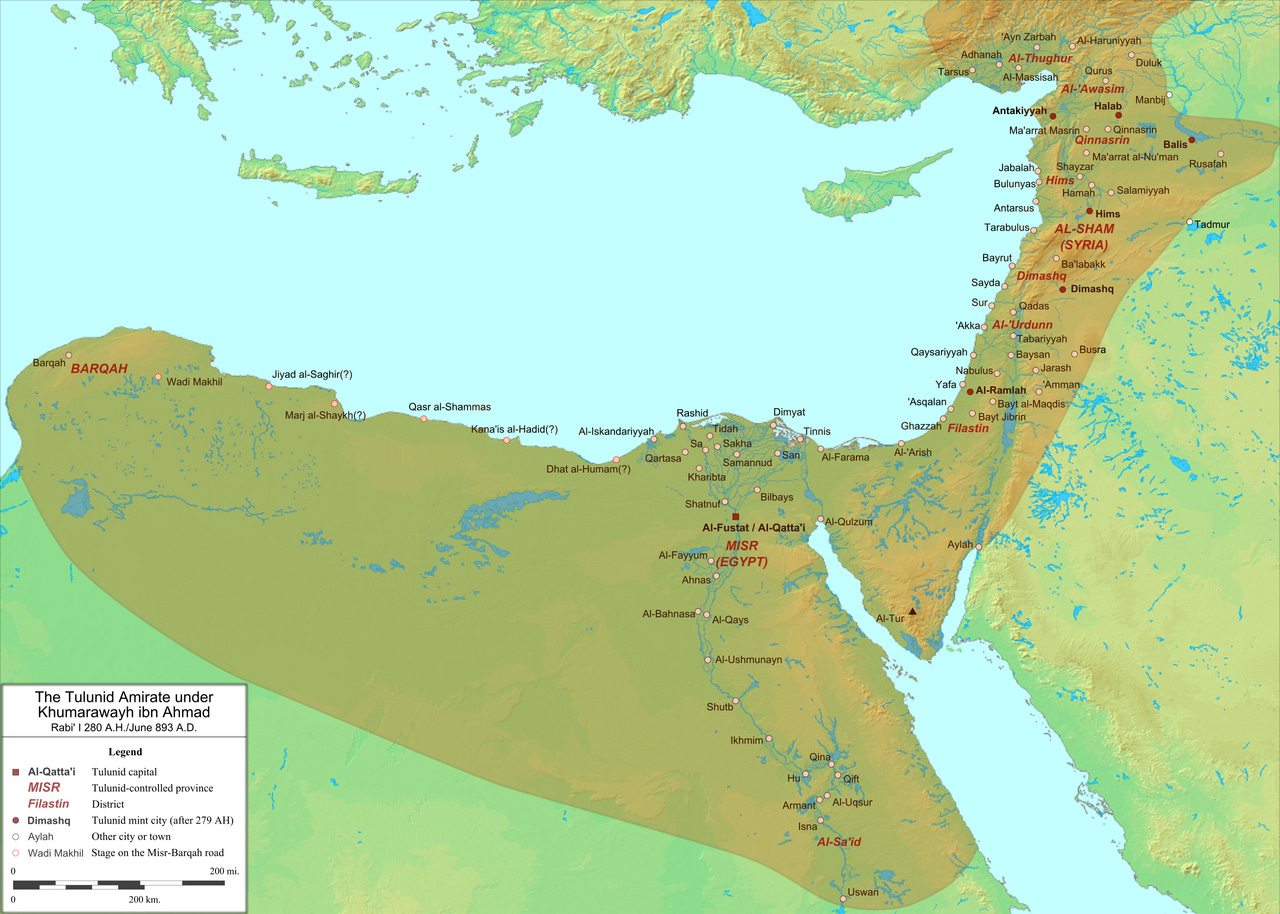
The two fundamental strategic difficulties of the eastern frontier were distance and logistics. We have already seen how the semi-arid environment of the Anatolian plateau prevented the Byzantines from keeping large numbers of troops concentrated at any one point, while their best troops had to be stationed around the capital for political reasons. This compelled them to distribute their border forces across military districts called themes, from which they could unite for a specific campaign.
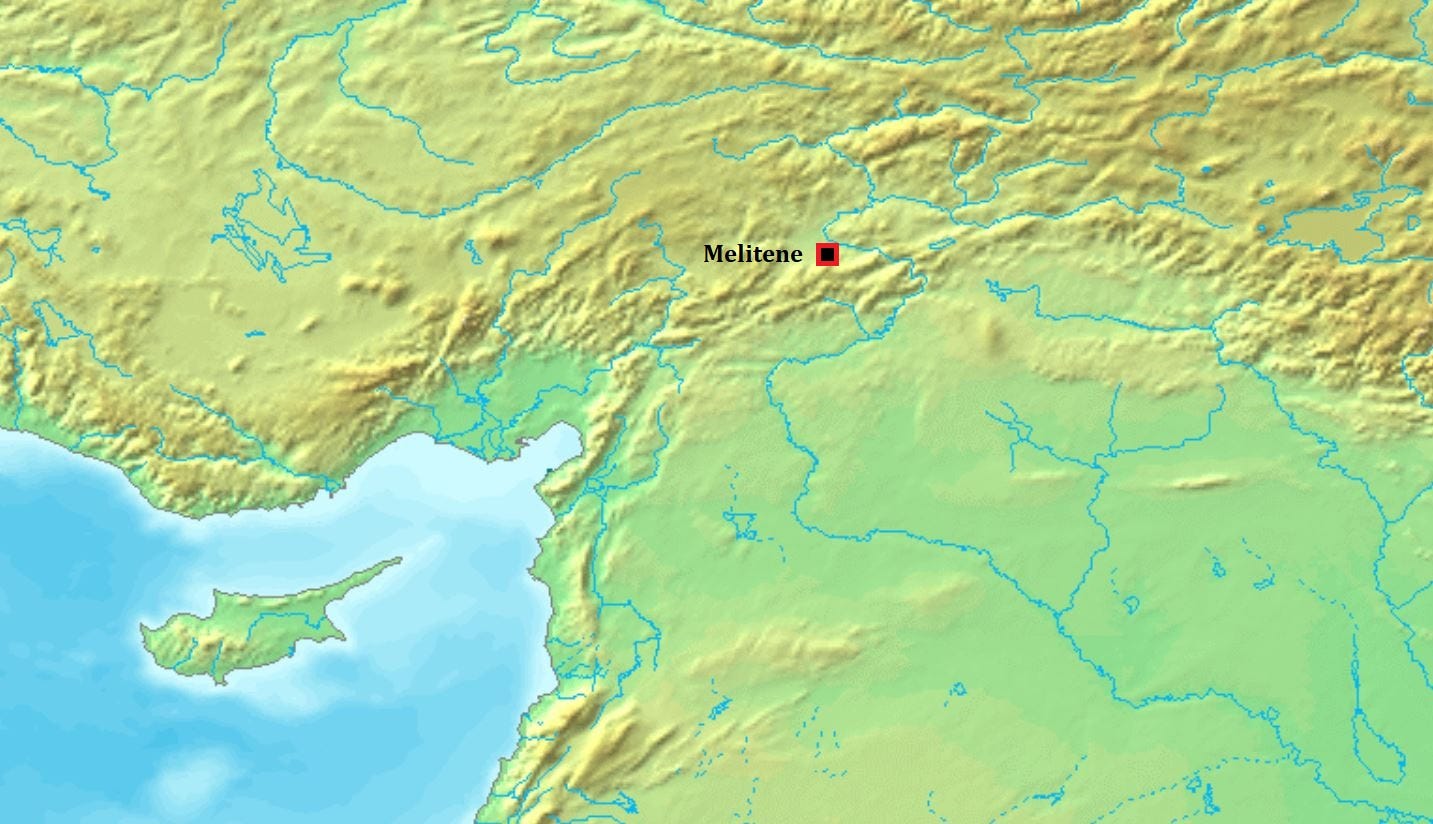
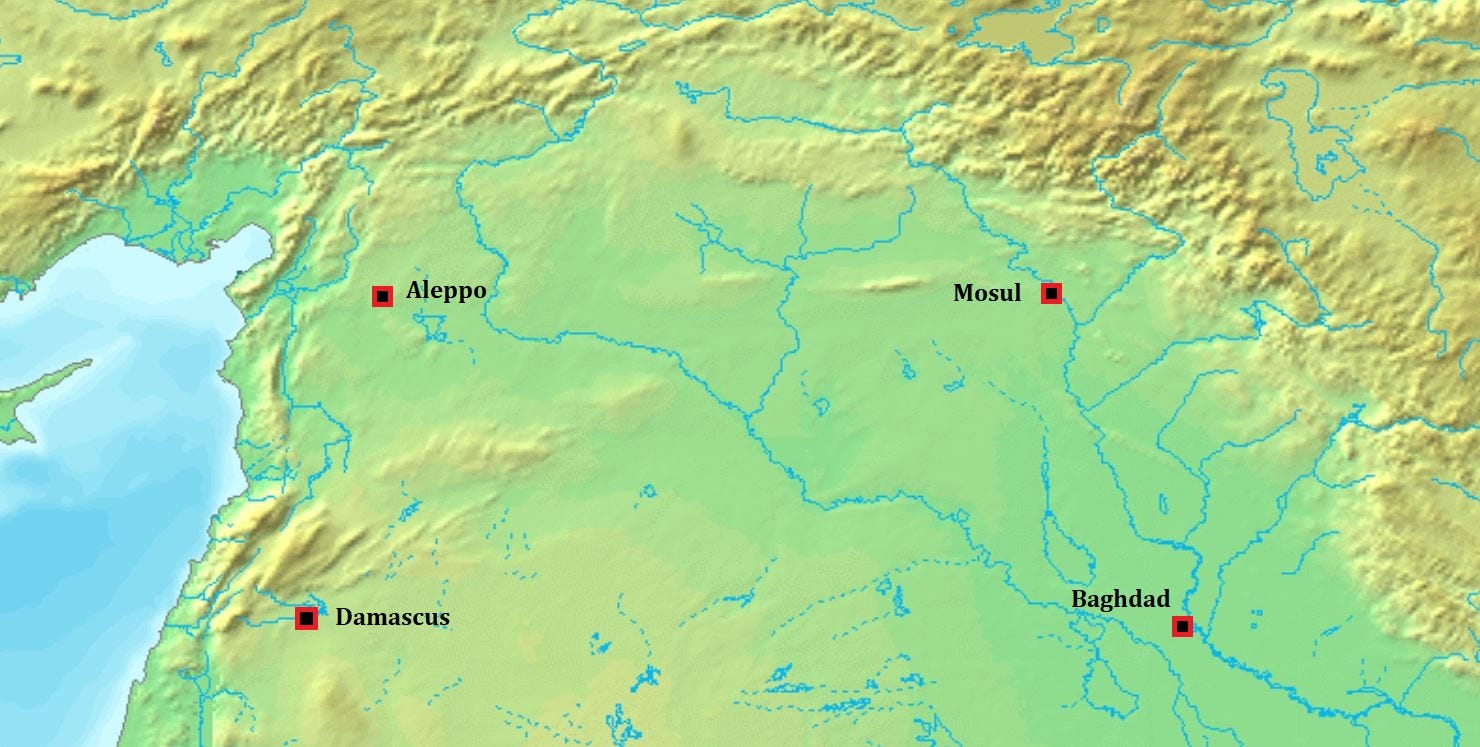
The Arabs, by contrast, could muster their armies in very fertile regions that allowed much higher concentrations of men and beasts. Tarsus in Cilicia, Hadath and Marash in northern Syria, and Melitene between the Anti-Taurus and Taurus Mountains all served as bases of operations for their raids.
This asymmetry guaranteed that the initial Byzantine response to an invasion was bound to be weak, but would gather strength over the following weeks as thematic armies linked up with one another and the imperial army marched out to join them. Although effective in repelling most incursions, it also allowed raiders plenty of time to wreak havoc.
The problem of time was exacerbated by flareups on the western frontier. The peace established between Byzantium and Bulgaria in 816 had mostly held through the 9th century, with only occasional quarrels. Relations improved in 864 when Khan Boris was baptized into Eastern-rite Christianity, bringing his people into the faith. Proximity often brings conflict of its own, however, and by the end of the century the two were often at war: for several years in the 890s, and again from 913 to 927.
These wars took substantial manpower away from the eastern frontier. Periods of active hostilities required the transfer of cavalry from Anatolia, while even peacetime troop levels had to be elevated—especially after the treaty of 896, which brought the Bulgarian border as close as 100 km from Constantinople. Substantial numbers of troops were needed to defend the Aegean coast against raids from Crete. Expeditions were intermittently sent to Italy, to defend Byzantine territory in the south against restive Lombards and raids from Muslim Sicily.
Developments in the Arab World
The balance of power in the east was in flux throughout this time. The turmoil which engulfed the Abbasids in the 860s led to the de facto independence of Egypt in 868 under its governor Ahmed ibn Tulun. Over the following decade he expanded his control to Syria and Cilicia. The Caliphate was occupied at this time by the Zanj Revolt, a major slave uprising in southern Iraq, giving Ibn Tulun free rein to deploy the resources of Egypt against Byzantium.
The Byzantines were as yet undistracted by the Bulgars, so things initially went in their favor. In 878 they recaptured Loulon, the fortress guarding the major pass of the Cilician Gates and the Arabs’ last toehold in Anatolia. They also made frequent raids in the territory of Melitene and attempted to take the city several times, although these efforts came to naught.
All this changed after war broke out with Bulgaria in the 890s. The Byzantines endured a horrendous defeat in the summer of 896, when the Bulgars smashed their field force, opening the road to Constantinople. The emperor was left with little choice but to sue for peace, agreeing to a humiliating treaty that formally ceded most of Thrace. The following year, a somewhat revivified Caliphate reasserted its authority over the borderlands, and in 898 brought nearly all of Syria back under its direct control.
The coincidence of Byzantine reversals with buoyed Arab fortunes reignited the war in Anatolia. Beginning in 897, the Abbasids launched a number of raids by land and sea, culminating in a major expedition in 904 that sacked Thessalonica, the second city of the empire. The Byzantines retaliated with an expedition beyond the Taurus which destroyed a large Arab field army, and the two sides agreed to a truce which held for the next several years.
Abbasid raids picked up again from 909 on a near-annual basis, but outbreaks of rebellion in Egypt, Mesopotamia, and Azerbaijan forced them to renew an uneasy truce in 917. This was felicitous timing for Constantinople, as hostilities with Bulgaria had broken out yet again in 913. The war was not going well: the Bulgarians briefly besieged the capital in the first year of the conflict and soon occupied much of the empire’s European territories. The peace with the Arabs allowed the Byzantines to concentrate a large army on the western front, where it was thoroughly defeated that same year.
The Byzantine Counter-Offensive
The Bulgarian war dragged on for another decade until a treaty was signed in 927. The emperor agreed to renew tribute payments and recognize the Bulgarian monarch as a coequal in return for restoration of the prewar borders. This ultimately proved to be well worth the cost: the treaty held for the next four decades, long enough for the Byzantines to win their war in the east.
This process began with a general named John Kourkouas, who led several campaigns to the east immediately following the peace. The Byzantine army had not performed well in previous decades of fighting with the Bulgarians; coupled with Arab successes around the turn of the century, this suggests that several decades of peace in the second half of the 9th century had been bad for the army.
In 923, John was appointed commander of the tagmatic armies (the professional forces stationed around the capital), and appears to have immediately reformed and reenergized the military establishment. He began leading campaigns against the Arab borderlands even before the peace was signed with Bulgaria; one such area, the neighborhood of Melitene, became the focus of several campaigns and was to be the first major reconquest of the 10th century.
Melitene was a well-judged target for reconquest. The city occupied a narrow plain on the upper Euphrates, fertile land that had long attracted Byzantine raids. Sandwiched between the Taurus and Anti-Taurus Mountains, it was a bite-sized chunk that could be reasonably absorbed in the space of a few dedicated campaigns, while the Taurus furnished a shield against Muslim counteractions from the south. The region moreover had a sizable population of Armenian Christians, who were largely sympathetic to the empire.
For all that, Kourkouas’ initial design was not conquer this region, but merely to bring it under tribute. Several campaigns won mixed success, and intermittently forced the emir of Melitene to recognize Byzantine suzerainty. But Abbasid reinforcements from beyond the Taurus and counterraids into Anatolia—one of which sacked Amorion (just a shadow of its former glory after the vicious sack in 838)—prevented Kourkouas from securing his gains.
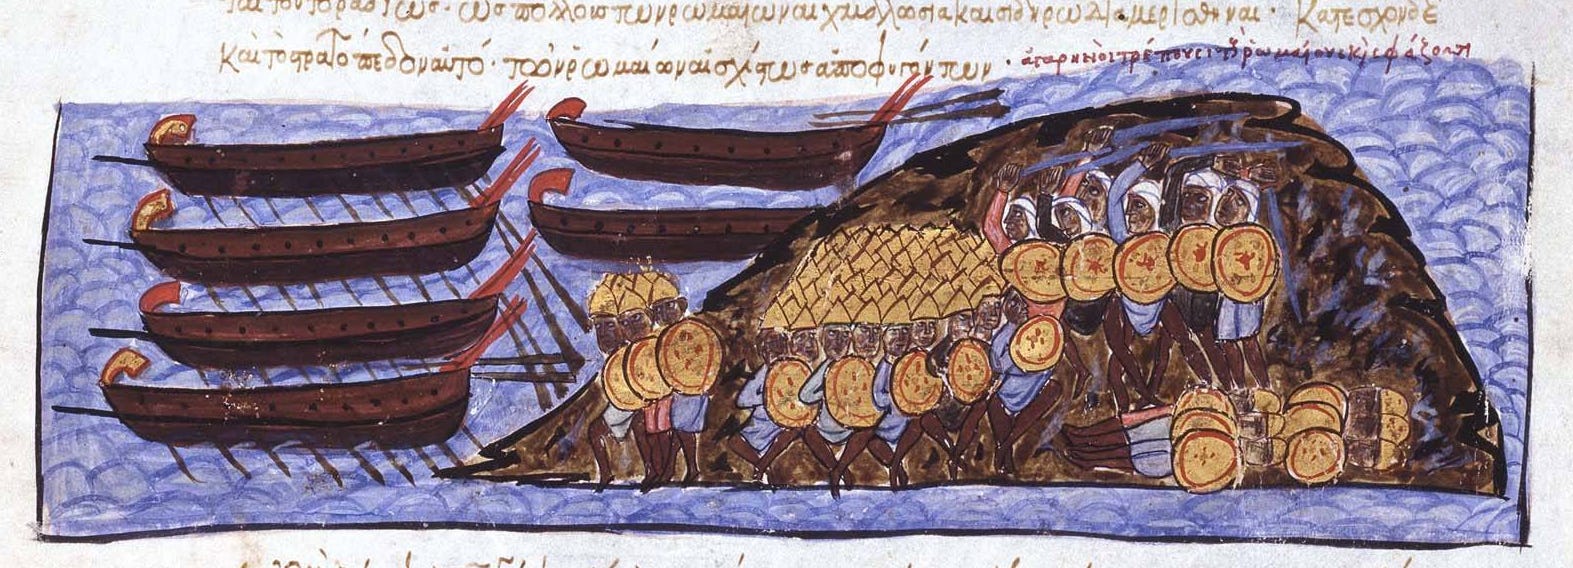
It became apparent that no vassal relationship with a Muslim emir could endure so close to Abbasid territory; Kourkouas therefore resolved to conquer Melitene outright. Early in 934, he marched over the Anti-Taurus Mountains and the city capitulated in May. All Muslims were forced to convert or go into exile to ensure the loyalty of the populace, and the region was brought directly under Constantinople’s rule.
The fall of Melitene marked a major shift in Byzantine fortunes. The outcome of wars with the Bulgarians and Arabs since the 890s had been dismal. Kourkouas’ conquest was not just a major triumph of Byzantine arms, but the first major recovery of territory beyond Anatolia since the beginning of the Arab conquests. It had more immediate benefits as well: the territory served as a buffer on Anatolia’s eastern flank and served as a jumping-off point from which the imperial army could threaten the Abbasid heartland.
Rise of the Hamdanids
The timing was particularly unfortunate for the Abbasids, who were undergoing an especially turbulent period. Just weeks before the city fell, the ruling caliph was murdered in a palace coup, which led to another splintering of the fragile Caliphate in the 930s. Baghdad was subjected to vicious infighting as ministers jockeyed for power and the caliph was reduced to a puppet.
Amidst this chaos, regional governors began to break away. The year after Melitene’s capture, Egypt fell out of Baghdad’s orbit for good, and within a few years its governor again extended control over Syria. In Persia, a number of regional dynasties competed for control of the Iranian plateau. In northern Mesopotamia, one dynasty, the Hamdanids, maintained a state of semi-autonomy.
The Hamdanids were a military family that had furnished several governors of Mosul. They had long resisted centralized control, and used the collapse in Baghdad’s authority to gain more autonomy and extend their dominions; at the same time, they backed one faction in the internecine strife to gain influence over what remained of the Caliphate. After a brief period of ascendance in which they effectively gained control of the government, the family was shut out of power in 943, when a powerful Persian dynasty marched on Baghdad.
The reigning emir of Mosul, Nasir ad-Dawla, came to terms with the new hegemon and received guarantees for his own territory, but the new balance of power frustrated the ambitions of the cadet branches of his house. His talented younger brother Ali, who had received the epithet Sayf ad-Dawla (Sword of the State) for his earlier military victories in service to the caliph, now turned his attention westward to carve out a state of his own. With his brother’s backing and the support of local Bedouin, he captured Aleppo without a fight in 944. He then fought a series of campaigns for control of Syria with the Egyptians, with whom he established a stable modus vivendi by 947. A treaty between the two powers left him the ruler of nearly all Syria north of Damascus plus western Mesopotamia, and the overlord of the Emir of Tarsus, who controlled Cilicia.
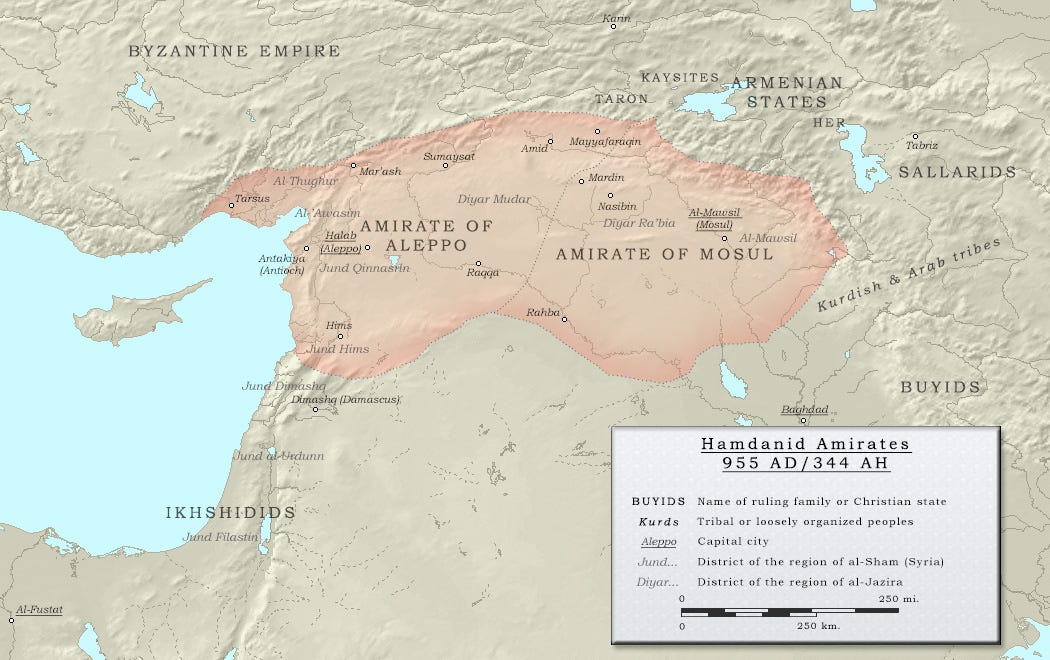
This vast new territory extended the entire length of the Byzantine frontier, making Sayf ad-Dawla the de facto leader of the holy war. His reputation and charisma were a great boost to Muslim morale. Syria and Mesopotamia had suffered greatly at the hands of John Kourkouas, who conducted a series of aggressive campaigns in the 940s that sacked a number of important cities. Kourkouas fell victim to Constantinople’s court politics and was dismissed from service in 944, just as Sayf ad-Dawla was moving on Aleppo, giving the new Emir of Aleppo a golden opportunity to make a name for himself.
Sayf ad-Dawla already had some experience fighting the Byzantines. He likely participated in the campaigns for Melitene in the 930s, and led armies against them in Syria and Armenia before his rise to independent power. He spent the early 940s caught up in intramural conflicts, but just a month after taking Aleppo he defeated an incursion by Kourkouas’ successor into Syria. The following winter, during a break in the war in the Egyptians, he led the first of many raids into Anatolia. It was not until 948, however, that the war picked up in earnest.
The Manuals
Before examining these campaigns, it is worth looking at the military writings of this period. These give us the fullest picture of what campaigns looked like in the 10th century, filling out the bare outlines that are sketched in the historical accounts. Four in particular are worth describing shortly.
The first of these was the Taktika, written by Emperor Leo VI sometime around the year 900. This was composed the height of the brief Abbasid resurgence which began in the 890s, during which Arab forces were striking Anatolia on a near-annual basis. Leo was renowned as a scholar (as suggested by his epithet “the Wise”), and drew heavily on older Byzantine writings. Large sections of the Taktika were copied verbatim from the Strategikon, composed around the year 600 by Emperor Maurice or one of his generals (for more on its contents, see here and here).
One of the most remarkable sections of the Stragikon is the series of short ethnographies of the empire’s enemies, describing their patterns of life and fighting styles in order to effectively plan campaigns against them. It was written the eve of the Islamic conquests, and thus did not include the Arabs, so Leo updated this section for the 10th century (he does not say how to fight the Bulgarians, averring that it would be impious to fight fellow Christians, but does describe how to fight another people just like them).
Keep reading with a 7-day free trial
Subscribe to The Bazaar of War to keep reading this post and get 7 days of free access to the full post archives.