
The Triumph of Sea Power: The Contest for the Indian Ocean, Part 3
On 5 January 1755, representatives of the British East India Company and the French Compagnie des Indes signed an agreement to formally end the Second Carnatic War. It had been a private war between two groups of merchants over commercial interests in India, even as their home governments remained at peace. The cost had been great, however, and after five years the profit-minded directors ordered their colonial agents to reach a settlement. Both sides made some gains—the British placed an ally on the throne of the Carnatic, while the French did the same in the Deccan and gained the Northern Sarkars (the coast of modern Andhra Pradesh)—but both were happy to get back to making money in peace.

That peace would prove short-lived. Events across the globe soon brought Britain and France into conflict, and dragged their India companies along with them. Even before the initial armistice halted the war in India in 1754, fighting broke out between French and British colonists in North America. Tensions were also growing in Europe, where a mesh of conflicting interests led various countries to feel out allies and prepare for hostilities. Finally in 1756, the machinery of the European alliance system finally kicked into gear and brought the world to war.
Such alliance systems were not something unique to Europe. As Part 1 and Part 2 argued, the first two Carnatic Wars are best understood as conflicts between coalitions of European and Indian powers. Britain and France were not even always the senior partners in these alliances. Native princes were animated by a complex web of alliances that extended far beyond the Carnatic, and European troops were decidedly auxiliary in some campaigns.
Looking at it from the other direction, native alliances were one of several essential tools to accomplish their aims in India, along with their corps of colonial infantry, trade links, and sea power. It is that last element, sea power, that is the focus of this final installment. It had played a limited role in the previous two conflicts. British and French naval strength was roughly balanced in the First Carnatic War—the French enjoyed an initial advantage that allowed them to seize Madras, while the British were unable to exploit their subsequent advantage—and it played no direct role in the Second.
In two subsequent wars, by contrast, sea power was far more important. The British managed to gain mastery of the Indian Ocean during the Third Carnatic War, which severely hampered French operations on land and contributed to the loss of their territories. The French attempted to restore their position during their intervention in the American Revolution; but despite a skillful campaign in 1782-83, they could not establish the kind of sea control that could be exploited on land.
These two wars, which are the focus of this piece, do not demonstrate that sea power alone was decisive in India; rather, they show how it was a missing element for decisive actions. They also present a rare occasion in which maritime control of the Indian Ocean was a major strategic objective in itself—this alone makes it an interesting object of study.
The Seven Years’ War
Hostilities between Britain and France erupted on 20 April 1756 when a French expedition landed on British Menorca. The news took the better part of a year to reach India, by which time the East India Company had gotten itself embroiled in a new war of its own—this time in Bengal, in northeast India. The nawab of Bengal, Siraj-ud-Daula, had long harbored suspicions against the British, which were only aroused when they began repairing Calcutta’s fortifications in April 1756, motivated by rumors of impending war with France. He sent a messenger to order them to stop, who was rebuffed; Siraj-ud-Daula thereupon gathered a large force at his capital Murshibad and marched south in May. After seizing the British trading station at Cossimbazar (Kasim Bazar), he arrived before Calcutta on 16 June, and three days later the garrison surrendered.
The French faced similar problems of their own on the Deccan. Their general Charles de Bussy had won great victories there in the previous war in service to the Nizam, Salabat Jung. He was rewarded with lavish gifts and a high position at court, arousing the jealousy of a hostile faction. In 1756, these men persuaded the impressionable Nizam to expel the French and invite the British to replace them as protectors.

Bussy duly left Aurangabad with his army in May and began marching back to the coast, whereupon his enemies attempted to drive home their victory. They ordered local authorities along the route to deprive him of supplies and sent an army to attack him, hoping to destroy his army for good. On 25 June, Bussy holed up at a strong position outside Hyderabad, where he was effectively besieged for the next two months. Pondicherry arranged a relief expedition, which with great difficulty managed to break through to Bussy’s camp on 15 August.
George Pigot, the British governor at Madras, had meanwhile leapt at Salabat Jung’s offer. He was happy to discomfit his rivals while war appeared to be in the offing, and immediately dispatched 800 troops with some artillery. News of the fall of Cossimbazar did not sway him from his course, but when he learned of Calcutta’s fall in early August, he was forced to recall the expedition to the Deccan. The Nizam was left in a lurch, with no choice but to reconcile with Bussy and readmit him into service. The French position in the Deccan was thereby restored, but was more insecure than ever before.
The Battle for Bengal
News of Calcutta’s fall was met in Madras with panic and outrage. Robert Clive, who had returned to India that spring with a commission as a lieutenant colonel, was put in charge of an expedition of 2,400 troops and an escort of four warships. This reached the mouth of the Hooghly River in December, where it linked up with the remnants of the garrison. The expedition then sailed upriver and retook Calcutta with comparative ease on 2 January.
Not long after, Siraj-ud-Daula appeared once more before Calcutta with a large host. The British skirmished with the nawab’s forces and largely got the worse of the fighting, but were saved by events elsewhere: an Afghan army was threatening Bengal’s western borders, forcing Siraj-ud-Daula to turn his attention there. The nawab rapidly concluded a generous agreement that allowed the British to fortify Calcutta and granted them several other privileges.
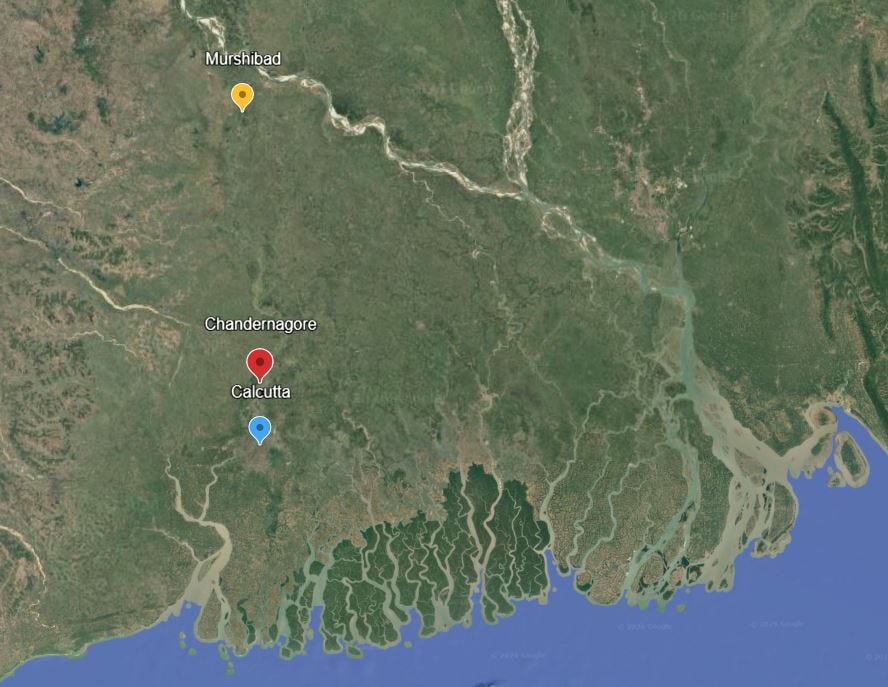
One thing the nawab strictly forbade, however, was any aggressive move against the French in Bengal—news of the war had finally arrived from Europe, and Clive was itching to attack. Yet no sooner had Siraj-ud-Daula departed, than Clive began plotting a move on the French settlement of Chandernagore, a short distance upstream from Calcutta. His joint force sailed upriver in March and opened the siege on the 14th. The small garrison could not resist the overwhelming bombardment by land and water, and surrendered ten days later.

The rapid siege had left no time for anyone to respond. Bussy, who had in the interim managed to shore up his position on the Deccan, only received news of the threat to Chandernagore in April, whereupon he began assembling a relief force. Once he learned of its fall, he marched to the Northern Sarkars instead to capture the few British trade stations along the coast. Siraj-ud-Daula prepared retaliation of his own, gathering a large army at Plassey (Palashi), for which he sought help from the Marathas of nearby Bihar and some French artillerists who had escaped Chandernagore.
The British at Calcutta received an unexpected boon when the commander-in-chief of Siraj-ud-Daula’s army, Mir Jafar, made secret overtures to them. He desired to overthrow his master and make himself nawab of Bengal, and offered them generous concessions for their assistance. They concluded an agreement in May, and the following month Clive marched north with an army just over 3,000 strong. After issuing a formal declaration of war against the nawab, he advanced to a strong position not far from the Plassey encampment on 22 June.
The following day’s action was not much of a battle. Siraj-ud-Daula marched out with a much larger army—reportedly 50,000 strong—and surrounded the British camp. His French gunners opened the engagement with accurate cannon fire, forcing Clive to pull his men back behind the embankments of a nearby mango grove. The two sides bombarded each other for the rest of the morning, until a drenching rainstorm brought the action to a halt for an hour after noon.

The rain had soaked much of the Bengali army’s powder, and they assumed it had done likewise to the British. Shortly after the rain stopped, Siraj-ud-Daula therefore ordered his cavalry to charge the enemy’s lines—where they discovered the British had in fact managed to keep their powder dry. Their gunners met the Bengali horse with blasts of grapeshot, driving it back in confusion and killing their commander. At that, the nawab ordered his army bank into the entrenchments of his camp; Mir Jafar, whose division was posted on the left flank of the Bengali army, was true to his word and remained behind to join up with the British.
Clive then pressed forward, driving back the few French gunners who remained on the field, and began cannonading the enemy camp from a strong nearby position. The Bengali army dissolved into a flood out the opposite end of the camp, leaving the British in command of the battlefield. A few days later Clive and Mir Jafar entered Murshibad, where the latter was installed on the throne, and Siraj-ud-Daula was captured soon after and executed. The new nawab kept his promises, granting the British extensive privileges and gifts of cash.

The Battle of Plassey certainly demonstrated British military effectiveness, but was hardly won by that alone. They had been trained in the rigorous school of the Carnatic wars, which in two previous wars had taught them the fighting style of native armies, how to navigate the subtleties of Indian politics, and the particularities of local terrain and weather. It was the combination of those elements, plus a great deal of luck, that won them the victory.
Bengal was to be for the British what the Deccan was for the French: a base area that was valuable for the long-term business of the East India Company, and which also provided money and manpower for the ongoing war. Likewise, it was also to prove something of an immediate liability, as it tied down significant numbers of troops that were urgently needed elsewhere.
The War Moves the South
Fighting had already broken out in the Carnatic, but for the first year of the war operations remained a confused patchwork of small-scale and indecisive maneuvers. Early in 1757, the British dispatched two expeditions to assist their ally Mohammad Ali Wallajah, Nawab of the Carnatic. Two of his brothers, both of whom he had made governors of important fortresses, were refusing to pay the requisite tribute. In February, Captain John Caillaud set out with most of the Trichinopoly garrison to attack Madura in the far south. In April, Colonel Francis Forde departed Madras to subdue Nellore, 150 km to the north, which had received a small body of French troops in return for the grant of trading stations on the nearby coast.
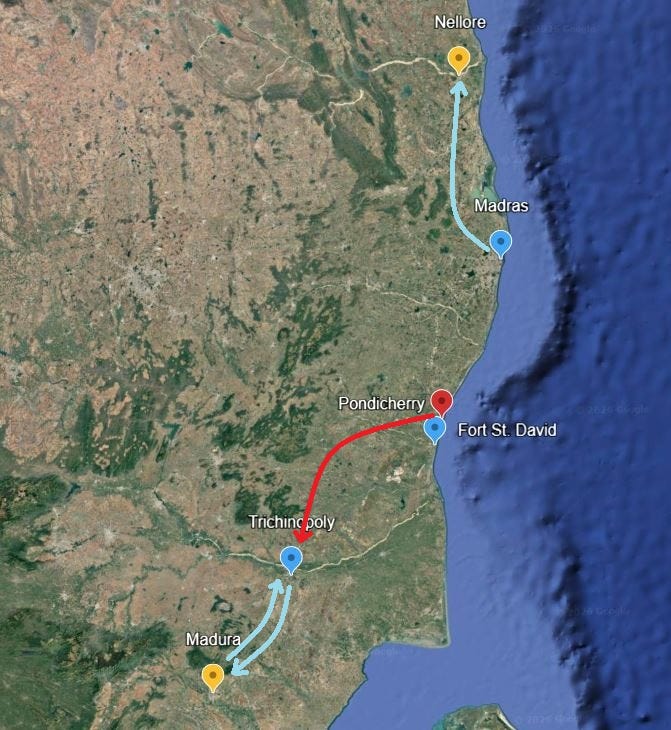
The French governor Leyrit had meanwhile received instructions to await reinforcements before attempting major operations against the British—an expedition had set sail from France the previous November. Leyrit spotted an irresistible opportunity, however: most of the best British troops were off in Bengal, while many of the remainder had been sent off to the extreme north and extreme south of the Carnatic. Leyrit sent Louis-Hubert d’Auteuil to attack Trichinopoly, his enemies’ great stronghold in the south (d’Auteuil had commanded the opening and closing stages of the First Siege of Trichinopoly in the previous war).
D’Auteuil set out from Pondicherry in early April. He captured the small British fort of Elavanasur on his march south and reached Trichinopoly on 14 May. His 2,150 infantry and ten-gun battery were not enough to attack the 850-strong garrison, so he attempted to bombard it into submission. The defenders were not intimidated, however, and Caillaud soon managed to slip back into the city with over 1,300 men, forcing d’Auteuil to abandon his effort and return north.
The British had meanwhile faced a setback of their own. Even before d’Auteuil reached Trichinopoly, Forde made a breach in the walls of Nellore, but his assault was repulsed with heavy losses. Pigot soon directed him back south to reinforce a corps being sent against Utramalore, a French-held fortress roughly midway between Madras and Pondicherry. The garrison retreated to the much stronger town of Wandiwash (Vandavasi). The British followed them there, arriving before the town on 5 June and taking it the next day; but French reinforcements (including those recently returned from Trichinopoly) arrived before they could take the fort, forcing them to abandon the place altogether.
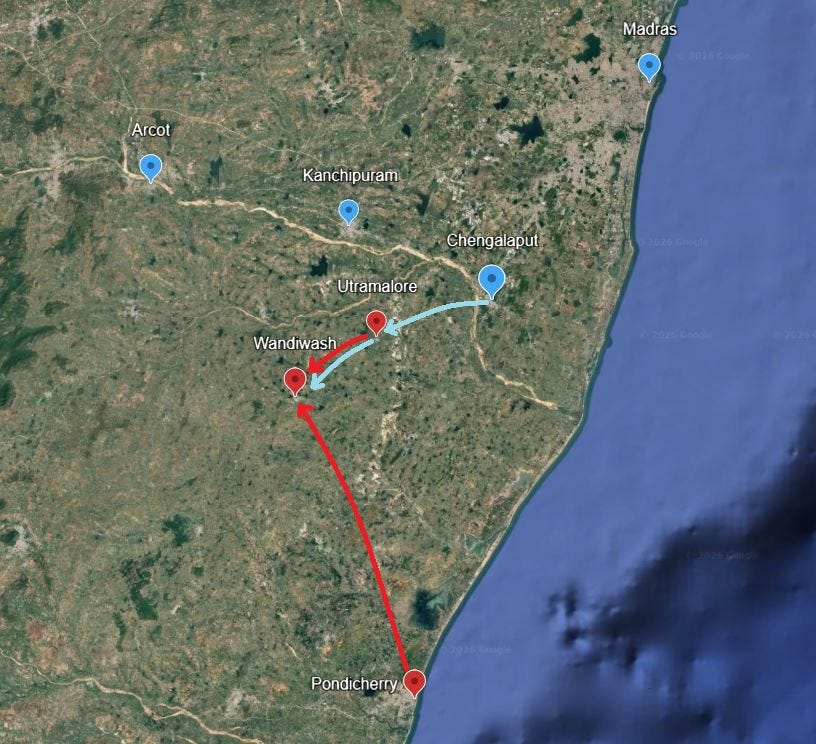
Wandiwash was to be the focal point of operations in the Carnatic for the next three years. It lay some 30 km south of the Palar River, the largest natural obstacle between Madras and Pondicherry, along which the British and their allies held a line of fortresses: Arcot, Kanchipuram, Chengalaput (Chengalpattu), and others. This made it the natural base of operations for French operations in the area, while its capture would expose Pondicherry to attack.
But little happened for the time being. With Clive was off in Bengal and Bussy in the Northern Sarkars, neither side had as many 2,000 European soldiers in the Carnatic, so they contented themselves with skirmishing and maneuvering over the next few months. The British at Trichinopoly did ultimately manage to seize Madura, but the balance sheet remained fairly even: both sides had made petty gains, but were unable to concentrate sufficient forces quickly enough to obtain anything more significant. A French resupply squadron arrived in September, landing 1,000 regular troops and an additional 600 sailors for shore duty, but even then they did not go on the offensive: another convoy was due the following spring, and Leyrit decided to wait before undertaking a grand effort.
Naval Maneuvers
The tempo of the next two years was to be dictated by sea power. As in the First Carnatic War, there was a symbiotic relationship between efforts on land and at sea. European-controlled ports allowed them to receive reinforcements and also provided safe harbors for ships to refit, making them the linchpin of operations on both land and sea. The key to control of the Carnatic therefore lay in controlling the ports, which itself was a joint undertaking: the most rapid means of concentrating troops against an objective was by water, and warships were needed to interdict enemy reinforcements.
The British Indian Ocean squadron, under Vice-Admiral Pocock, had remained in Bengal to assist Clive. Only in February 1758 did it return to Madras, where it was joined by reinforcements from Europe that brought it to a strength of seven ships-of-the-line and a frigate. It set off in April to intercept the French convoy that was reported to be inbound.
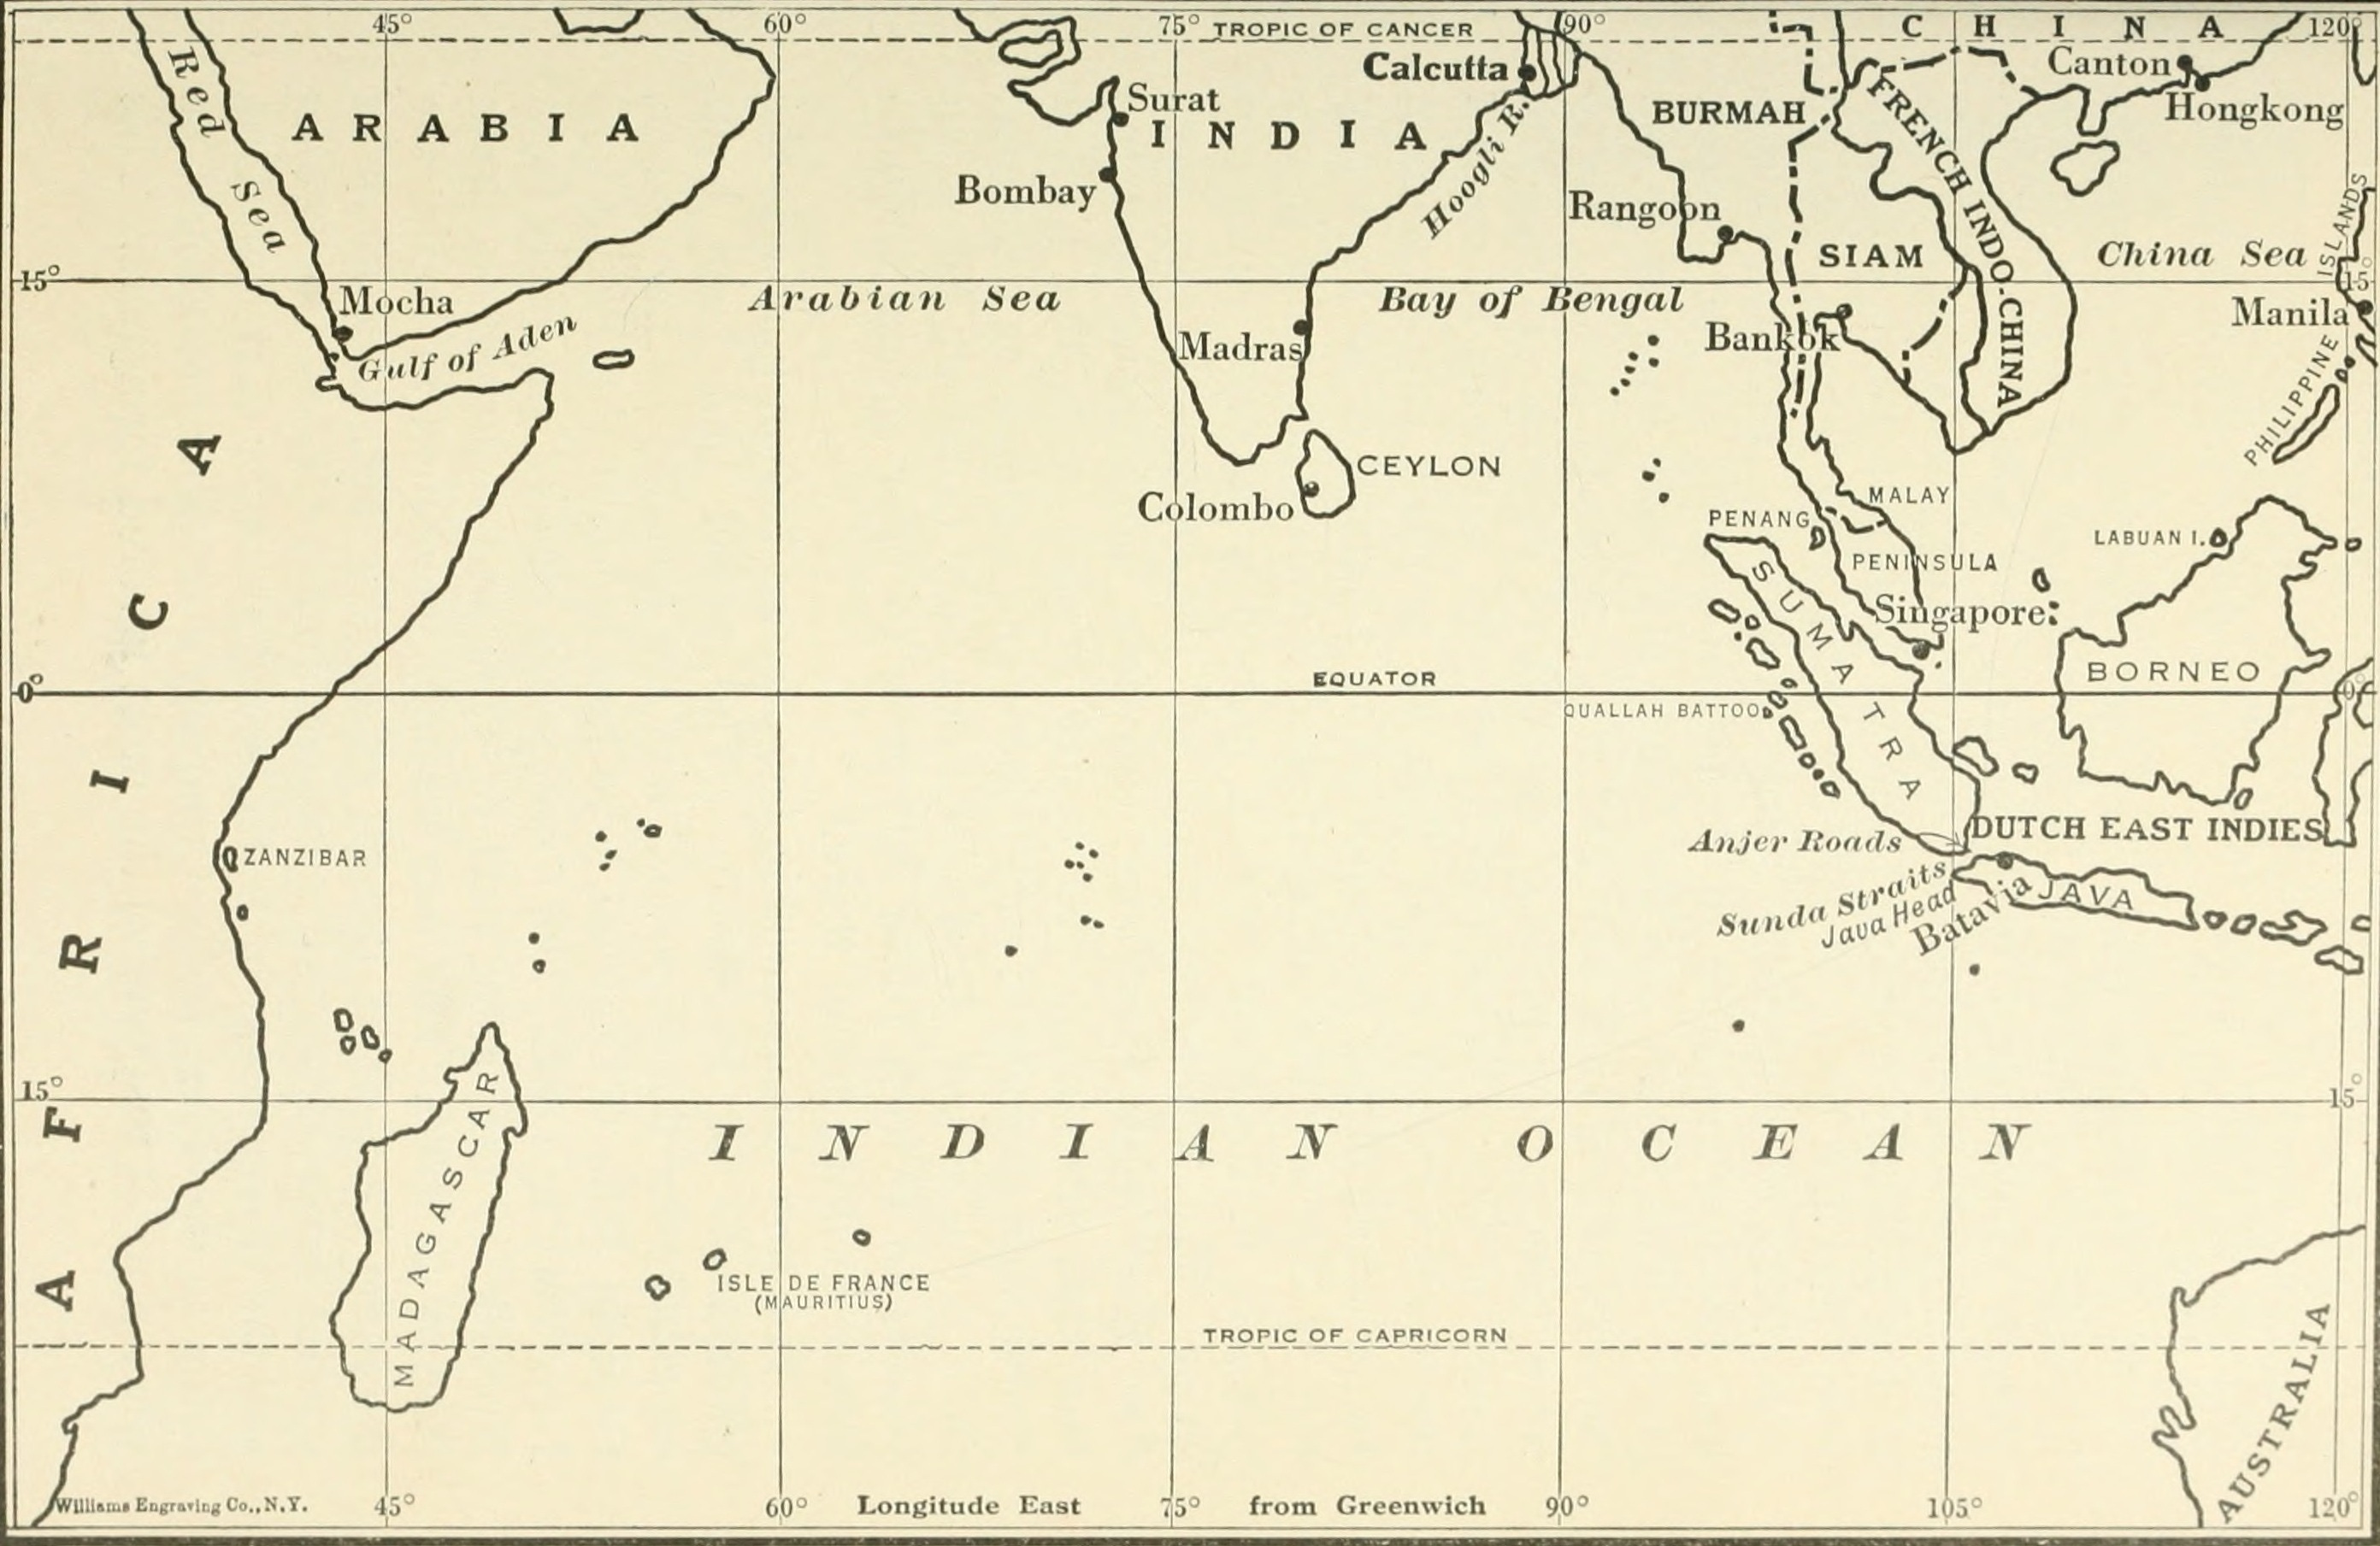
The French squadron which arrived the previous September returned to Mauritius for the winter, where it was joined in March by a second squadron under the Comte d’Aché. Mauritius—or Isle de France, as it was called at the time—was invaluable to French strategy in the Indian Ocean. Its strong fortifications, combined with its great distance from any other port, made it extremely difficult to attack—an ideal staging ground for troops and supplies on the final leg of the voyage to India. This was especially useful since French naval power had been seriously weakened over the previous decades by a combination of neglect and losses in the War of the Austrian Succession (1740-48), which often forced them to send piecemeal reinforcements with inadequate escorts.
D’Aché took command of the combined squadron and set sail at the end of January. His nine ships-of-the-line and two frigates outnumbered Pocock, but with the sole exception of his flagship, all his vessels were converted merchantmen that did not handle as well as true warships; several also had to reduce their complement of guns in order to carry more troops and cargo. His effective strength was further reduced when, as the squadron neared Pondicherry, a ship and a frigate raced ahead to land their soldiers, leaving him with just eight large ships when Pocock attacked him on 29 April.
Keep reading with a 7-day free trial
Subscribe to The Bazaar of War to keep reading this post and get 7 days of free access to the full post archives.